Burp Suite is a graphical (GUI) application that is primarily used for testing web applications. Burp Suite is also written and abbreviated as "Burp" or "BurpSuite" and is developed by PortSwigger Security.
Burp Suite consists of multiple applications such as a scanner, proxy, spider etc.
But Burp Suite also comes in 2 variants, namely a free (community) and a paid (professional) variant. The community edition of Burp Suite only has the basic functionalities compared to the professional edition. In this post we deal with the community version which is already installed by default in Kali Linux.

The community edition is especially interesting for mapping the web application. You can use the following Burp tools in the community edition, among others:
- Advanced application-aware crawler
- Detailed scope-based configuration so that you can work accurately and precisely
- Custom "not-found" web responses detective with which false positives can be prevented
- Tree-based display in which all found content is displayed.
- Burp Suite (Man-in-the-middle) proxy that allows you to intercept all browsing traffic
- A number of "manual" test tools such as the http message editor, session token analysis, sitemap compare tool and much more.
- BApp Store where you can find ready-made Burp Suite extensions developed by the Burp Suite community
- Burp Suit API so that Burp Suite can work together with other tools
The professional version of Burp Suite costs around 330 euros per year, but you will get a lot of extras for that, such as:
- Automatically crawl and scan over 100 common web vulnerabilities
- Support for various attack insertion points with requests such as parameters, cookies, headers etc.
- Advanced manual scan options
- Advanced scan logic and processing such as analysis of static code, out-of-band techniques, IAST and support of the newest techniques such as JSON, REST, AJAX etc.
- Vulnerabilities sitemap, vulnerability advise etc.
- Burp Intruder for the automation of custom attacks that increase the speed and effectiveness of manual tests such as placing payloads, applying "fuzzing", using internal word lists, etc.
- Even more "manual testing" tools
- The ability to create HTML reports or to export found vulnerabilities to XML
The biggest difference between the community and professional edition is that the professional edition of Burp Suite gives the user more access to perform automatic testing. The community edition lacks a lot of functionality and focuses primarily on "manual" tests. As far as I'm concerned, the community version is therefore more a demo for the professional version. But yes, everyone has to earn money right?
Comment by stackcrash:Just one thing to point out. The biggest difference between community and pro isn't the automated scanning it's the extensions. Only pro will allow extensions to creat custom issues which is how quite a few of the quality extensions work. The automated scanning is nice but from a bug bounty perspective it's not really used.
Below I describe the Burp Suite tools with which the community version is (sometimes partially) equipped. The professional edition is also equipped with the Burp Intruder which makes it possible to automatically attack web applications and the Burp Scanner which can automatically scan for common web application vulnerabilities. Also take into account that the professional variant has the option to save and restore projects, search within projects, can plan tasks and receive periodic updates.
But enough about all the extras of the professional version. Now we continue with the community version. These are all Burp Suite components that you have access to in this community edition:
Burp Proxy
The Burp Proxy allows you to start a proxy server through which all traffic between points A and B goes through the proxy and can therefore be analyzed in detail. Burp Suite makes it possible to modify a received message before it is forwarded again.
Burp Spider
The Burp Spider crawls the website and maps each page and each sub-component. The spider is often used as an addition to the manual mapping process.
Burp Repeater
The Burp Repeater makes it possible to perform stress tests. Web applications can be sensitive to stress tests. It may be that during large applications they have to process so much that they are compromised or that the security is compromised, so that during a stress test you enter the web application via a method that is normally captured.
Burp Sequencer
The Burp Sequencer is a tool for analyzing the quality of randomness in a sample of data. It can be used to test session tokens or other important data items that should actually be "unpredictable." Think of anti-CSRF tokens, password recovery tokens, etc.
Burp Decoder
The Burp Decoder is a tool for transforming encrypted data (in its canonical form), or for transforming raw data into various encrypted and hashed forms. The Burp Decoder is able to intelligently recognize different coding formats with the help of heuristic techniques.
Burp Comparer
The Burp Comparer is a tool to compare 2 types of data.
Hey nice thing about Burp Suite is the integration of all tools. All Burp tools work together seamlessly. This way you can send data from one tool to another to use it again. In addition, the functionality can be considerably expanded through the BApp Store extensions and the Burp API.
Due to the many functionalities of Burp Suite it is not an easy tool. If you know exactly what you are doing like experienced WebApp testers, then Burp Suite is a breeze. If you are just starting out, it is important to empathize and to view and test options at every step. There is also a lot of information on the
Burp Suite website which I recommend to read.
As already mentioned, Burp Suite (community edition) is present by default within Kali Linux. However, Burp Suite is also available as a Windows (x64) binary or as a JAR file. Burp Suite is written in Java and therefore very easy to install. Make sure Java is installed (“java version” command in the Windows command prompt) and double-click the JAR file. You can also call up the JAR file via the command line, which has several advantages. You have more control over the execution of the application via the command line. For example, you can specify how much memory you want to allocate to running Burp Suite. To allocate 2GB you use for example -mx flag.
1java -jar -Xmx2G /path/to/burp.jar
where 2 is the amount of memory (in Gb) that you want to assign to Burp, and /path/to/burp.jar is the location of the Burp JAR file on your computer.
On Windows and OSX you can also use the EXE that is created. On Linux there is no EXE and you must first execute a .sh file to create .exe:
1sh Burp_Suite_community_linux_v1_7_33.sh
Now you can always easily start Burp Suite. by typing burpsuite in your terminal
1burpsuite
Burpsuite interface
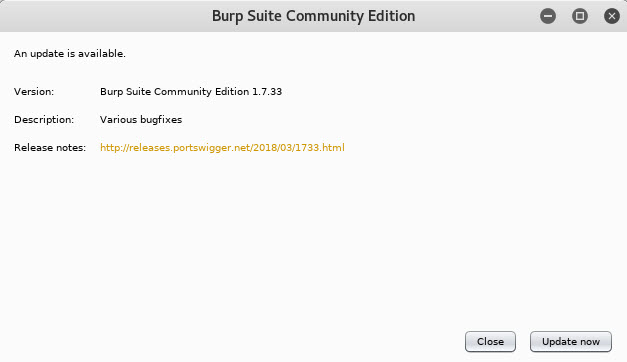
When you start Burp Suite for the first time you must of course agree to a legal disclaimer / license agreement. If there are updates, Burp Suite will report this. It is advisable to always work with the most recent version. Updating a new Burp Suite version is identical to a new installation. The application does not update itself.
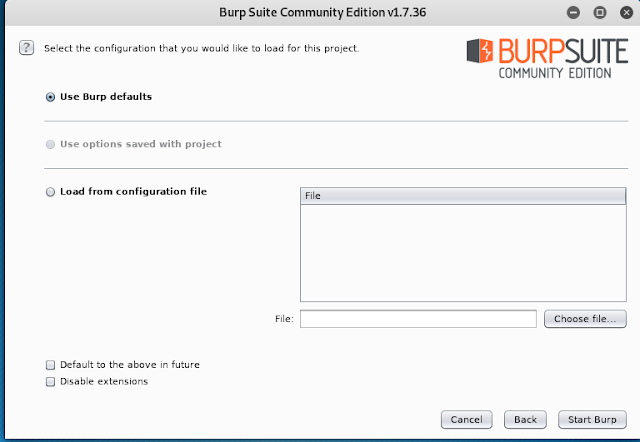
When starting Burp Suite you will be asked if you want to save the project or not. If you choose a "Temporary Project" then all data will be stored in memory. This data is gone as soon as Burp Suite is closed. You can also create a project to save all data and of course you can also choose to open an existing project. Note: the community version only gives you the option to create a temporary project. So you cannot save any data on the disk here.
You can then load a configuration file or start BurpSuite with the default configuration.
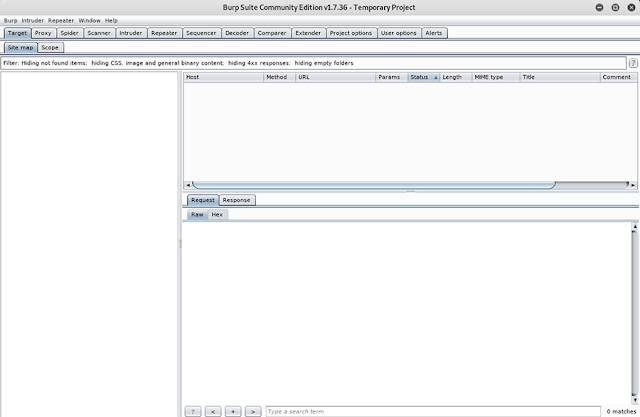
When all this is done, Burp Suite starts. The interface looks like this:
We can roughly divide the interface into 7 parts, namely:

1. The main menu
The main menu gives you access to the Burp Suite options. So here you can configure the layout of Burp Suite and you can set how Burp Suite should work.
2. The toolbar
The toolbar gives you quick access to all Burp Suite tools such as the Proxy, Spider and Repeater. You also have access to all "professional" tools, but these will not work or only partially work. There are also tabs for the "target" where the most results are shown, for options, project options and for alerts. You have quick access to most tools via the toolbar.
3. Workplace switcher
The workplace switcher is not present on all tabs, but it does apply to many tools and overviews. The workplace switcher ensures that the main screen (main window) where all results can be seen is switched to another view. The workplace switcher will often help you switch between various tool-specific settings.
4. Tree-based sitemap
Within the target tool, site map section, the left column is the "sitemap" which is represented as a tree structure. You navigate through all found assets via this column.
5. Detail window
The detail window shows more information and possibilities about the assets that are selected in the left sitemap.
6. Response / Request switcher
This switcher is only present on the "target" tab, but there are other tabs with similar switchers. These switchers give you the option to switch parts of the main window to another view. This switcher therefore switches between the details of the request (request) and the feedback (response) of the asset selected in the "detail window".
7. Response / Request details
This view provides insight into the details of the requests (requests) and feedbacks (responses).
Burpsuite Settings
As already mentioned, each tab (every tool) has its own layout and settings. Before we start working with Burp Suite, it is good to already set a number of settings correctly and save them as a configuration file so that these settings can be read in according to a project. The configuration file prevents us from having to re-optimize all settings every time. I would already set the following settings correctly: First, let's take a look at the display settings. These settings determine what the results will look like on the screen. The display settings can be found under the "User Options" tab and then the "Display" tab. Here we can adjust the font type and size of the letters. Can also adjust this for the "HTTP Message" displays. Then we can set which character sets should be used and whether HTML rendering (so that HTML is reconstructed) should be on. I usually don't change much here. These are my settings:

Next, under "Project Options" - "Sessions", how Burp Suite updates the so-called "Cookie Jar" is set. By default, the Cookie Jar is updated by monitoring the Proxy and Spider tool. I always like to add the "Scanner" tool to this:
Next we find the "logging" options under the "Misc" tab. I always switch this on for the Proxy (depending on the project sometimes for more or for all tools):
To begin with, this is all. The other options are fine for me and so we are now "good-to-go".
Do you want to make more options yourself and save them in a configuration file. You can save this configuration file and read it back later via the main menu - Burp - User Options / Project Options - Save User / Project Options.
Burp Suite Example
Then everything comes down to using the tool. Burp Suite can be used for countless tests and many types of "attacks". It is essential to know what you are doing and what a certain attack is and what options you can set and use for this.


Comentários
Postar um comentário